Analytics

Monday, 22 February 2021

February Block of the Month: Scrappy Bear Paws


I think we’re slowly coming out of hibernation, guys! And to celebrate the move from late winter into (very) early spring, we’re going to make scrappy bear paws! Fun fact: bears come out of hibernation in mid- to late March, which aligns nicely with our March guild meeting. Also, look how big a grizzly bear's paw is! Yikes.


I’ve heavily borrowed the instructions below from Jeni Baker, who runs the blog In Color Order (check out her instagram: @jenib320) and has written an entire book about half-square triangles. Check her out - she's lovely!


Here’s our colour plan for these blocks:

Background:

Scrappy low-volume (is there any other way?)

This can be any mix of white, cream, light grey, white with small black or colour accents, etc. Prints or solids, whatever works. The scrappier, the better!

Paws:

Scrappy rainbow colours (one per block)

Our good friend Roy G. Biv is going to be our colour guide for this one. Your paw colours can be red, orange, yellow, green, blue, indigo, or violet. Each block should be a scrappy mix of one of these colours (rather than having all the rainbow in one block, for example). Solids or prints are totally welcome, do your thing!

Extra option: 

Feel free to make the 9.5" square part of the block scrappy as well! You could use whatever scrappy block method you like for this one; I tried out a 9-patch, and a couple of slab blocks for my examples. Anything goes, as long as it comes out looking like it’s a single rainbow colour. Or you can just do a single fabric for the large block (like the purple one in the photo below), whatever you prefer!


Cutting Instructions:


For each bear paw block, you will need:


Paw fabric (scrappy rainbow colours):

  • 1 x 9.5" square (this is the paw part, and it can be either a single fabric, or a scrappy single-colour block that measures 9.5” x 9.5”)

  • 3 x 4” squares


Background fabric (mixed low-volume):

  • 3 x 4” squares

  • 1 x 3.5” square


Sewing Instructions:


*Use a 1/4" seam allowance unless otherwise noted.*

*Completed blocks should measure 12.5" x 12.5"*



1. Using a marking pen or pencil, draw a diagonal line across the wrong side of the 4” background squares. Place one 4” background square and one 4” coloured square right sides together. Stitch 1/4" on both sides of the marked line. Cut apart on the marked line to create two half-square triangles. Press seams open. Repeat with remaining 4” squares. Trim half-square triangles to 3.5” square.


2. Arrange the six half-square triangles created in step one, plus the 9.5" square and one 3.5" background square as shown in the photo above.


3. Sew together the block following the sequence in the photo above.

    • First, sew the left three "claw" blocks together
    • Next, attach the claws to the left side of the 9.5" square to make the bottom unit of your block
    • Then sew together the background square and top four "claws" to form the top unit of the block (another row of "claws")
    • Sew the top and bottom units together to complete your block
    • Press seams open


Your completed blocks should measure 12.5" x 12.5".

Go ahead and share a photo of your BOM blocks on instagram - our hashtag is #ottmqgBOM if you want to see what other guild members are making! Personally, I'm excited to see which colour of the rainbow is going to be the most popular!


Happy sewing!

Leslie


Monday, 25 January 2021

February Block of the Month: Rally Blocks

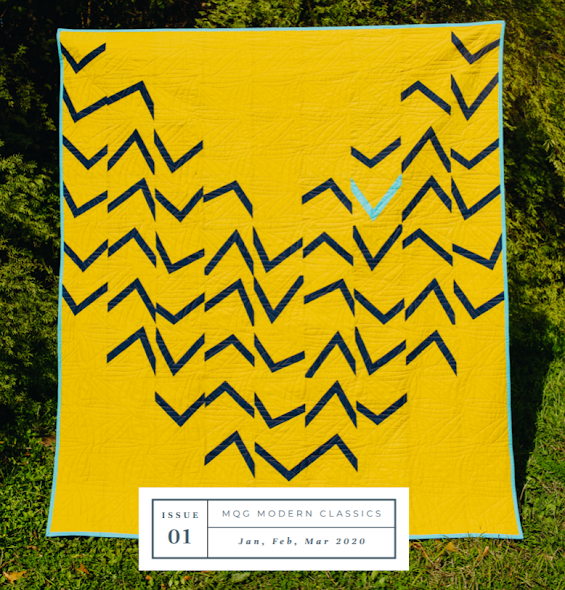
Rally Blocks - designed by Melanie Tuazon for the Modern Quilt Guild


This block is taken from Melanie Tuazon’s Rally Quilt, which she designed for the Modern Quilt Guild in early 2020. Melanie's instagram is @melanie.tuazon and her website is melintheattic.com. She's also teaching at Quiltcon Together at the end of February - check her out!


The full pattern for this quilt is available here on the MQG website (Modern Quilt Guild member log-in is required to access the full pattern): https://community.themodernquiltguild.com/sites/default/files/TuazonM_Rally_v5.pdf


Melanie's Note: This is guided improvisation, and will result in a different and unique block each time. Exact measurements are not used. Experimentation is encouraged. I used a rotary cutter and rulers when piecing the angles, but you can opt to use scissors or omit rulers for a much more organic look and feel. I recommend using rulers to square blocks up after the angles are pieced.


Regular viewers may note that this block’s construction is somewhat similar to the modern Christmas trees we did for the October BOM - yay for transferring our skills!


For the February BOM, we’re going to do this block in all solids, as a tribute to the Modern Quilt Guild (you may have noticed that MQG quilters loooove using solids!).


For each block, you will need the following fabrics:


  • 8” x 8” blocks - any SOLID dark colours (black, dark grey, navy blue, dark purple, dark green, etc. - anything that reads "dark")
  • 1.5” strips (6” or longer) - SOLID bright colours (yellows, whites, bright blues/turquoise, bright greens, pinks, oranges, etc. - anything that reads "light")


Block Sewing Instructions (these are taken directly from Melanie’s pattern):


1. Starting 1-2 inches from the bottom right corner of your block, cut a diagonal line up and through the top of the block. (fig. 1) 


2. Repeat for the left side. Cut up through the top from left to right, but do not cut through the triangle made from your first cut. (fig. 2) 

NOTE: Keep track of your two triangles and their orientation-- you’ll need them again soon. 


3. Starting on the left side, sew a strip to the background fabric. Press toward the dark fabric. (Finger pressing will work fine.) Trim any part of the strip that hangs over the center angle, using the side that is unsewn as your guide. (fig. 3) 


4. Sew a strip to the right side of the angle. Press toward dark fabric. Trim excess. (fig. 4) 


5. Sew top left triangle, aligning the edges closest to the angle’s peak. Press.

(fig. 5)

NOTE: Do not worry about perfection! Not all edges will or should line up. 


6. Sew top right triangle. Press. (fig. 6) 


7. Trim block to 7" square. 

NOTE: So that it doesn’t get lost in the seam allowance during assembly, be sure that your angle’s point is at least ¼" from the top edge of the block.


The variety of solid colours and angles from all of our blocks should make for a really cool finished quilt!


Thanks for joining in the February Block of the Month. Feel free to share photos of your finished Rally Blocks on social media - tag your photos with #ottmqgBOM to connect to everyone else's work, too!

Monday, 23 November 2020

December/January Block of the Month: Winter Webs

Here are the directions for the OMQG January Block of the Month draw. This one is a really great scrap buster that should produce a lovely winter-themed quilt - a perfect fit for our cold nights, but not so "seasonal" that it looks out of place in the other months of the year.


Note that for this month, one triangle unit = one block. The photo above is actually 4 blocks placed together.

Fabric requirements (this will make two blocks): 

  • - 8.5" x 8.5" square of solid white or low volume white fabric
  • - Varying lengths of fabric strips, from 1.5" to 2.5" wide

Strip colours should remind you of an ice storm: 

  • - blue (light blue all the way through to navy)
  • - black
  • - grey
  • - white
  • - cream

Solids or prints, whatever works (you should all have guessed this by now!). Here's what I started with:


BLOCK INSTRUCTIONS:

The actual name for this block is called a spiderweb, and there are a lot of online tutorials on how to make them. The measurements are a bit different, but feel free to consult this video from Art Gallery Fabrics for the basic design steps if you're feeling lost. (I followed along with it for my first block when I was putting this tutorial together.)

Note that all seam allowances are 1/4"

Cut your 8.5" x 8.5" white square in half on the diagonal, producing two (isosceles, if you want to get technical) triangles as below:


For each triangle: 

Fold the two side points of the triangle together and finger press to find the centre line of your triangle. 

Make two small marks at the bottom of the triangle, 1/4" from each side of the centre line.

Make two small marks on the two top sides of the triangle, 5.5" between from each point:  

Use a pencil or marker to draw a line between your marks on each half of the triangle:


Now for the fun part - it's time to add your strips! 

Place your first strip right sides together, on top of the triangle, aligning the edge of your first strip with your drawn line. All strips should be slightly longer than the white fabric triangle underneath:


Stitch the first strip down on the triangle with a 1/4" seam. Press the first strip out.


HOT TIP: 

For all strips after the first one, fold the point of the triangle under so that you are NOT stitching the rest of the strips down onto the point of fabric triangle (you're going to cut off the extra white fabric once you've done all your strips, so this part should "hang free" after the first strip. It's not complicated, but it took me a couple tries to remember to fold under the point of the triangle, so I'm just giving you the heads up to have your seam ripper ready in case you forget. You've been warned. :)


Align the long edge of your second strip with the unsewn edge of the first strip and stitch (right sides together). Continue with this process (each strip will be slightly shorter than the last one as you move out toward the point of the triangle) until you have connected enough strips to completely cover the first white triangle point. 

Repeat the above process with the other point of your white triangle:


Once you have added all your strips to both points of the triangle, press your strips away from each seam (I suppose that a person could have been pressing each seam as they sewed it, but I'm a little lazy and didn't want to get up and do that each time. I didn't see a big difference with waiting until all the strips were sewn together, but this is totally just a personal preference - whatever works!).


Turn your triangle over on your cutting mat and trim off the extra fabric from each side, using the white triangle as your guide:


For the last step, fold back each strip section and trim the white triangle underneath (this is why you had to fold under the white triangle when you were doing your strips!): 


And that's all there is to it! TA-DA!!!


And here's the "spiderweb" effect that this block produces when there are 8 of them all together!