

And what exactly is FPP? It is the method of sewing fabric together to a paper foundation that has been printed with the outline of a quilt block. The paper is removed once the sewing is complete.
The most difficult part of FPP for me and for a lot of people is dealing with the mirror image aspect because you are sewing seams on different angles. When the fabric is flipped after sewing a seam, it must completely cover a specific portion of the paper template. It can be somewhat of a challenge to position the fabric correctly. And because seams are sewn with tiny stitches, they can be difficult to rip out. I have the utmost faith that you will rise to the challenge. You've got this!
You can use regular printer paper or paper made specifically for paper piecing, parchment paper, or freezer paper. A word of caution: If you choose the freezer paper method, do not put freezer paper in a laser printer as it will melt the plastic coating on the freezer paper and perhaps damage the printer. Having said that, Sugaridoo suggests that you can put freezer paper in a laser printer if you follow her instructions at
https://www.youtube.com/watch?v=ciBiWqrYeQQ
You also have the option of tracing the template on to the freezer paper. A light box is useful for this purpose but not necessary.
You might find the following links helpful:
FPP tutorial from Kefi Blossom Designs: https://www.youtube.com/watch?v=AOyd-di96O8&t=593s
Freezer paper tutorial from Bethanne Nemesh: https://www.youtube.com/watch?v=HJNCrOL6USo
As mentioned, a light box can be utilized to make sure that the fabric overlaps the template. @crankykangaroo on Instagram suggests you can make your own light box by using a clear plastic bin with a cell phone flashlight inside. Or simply prop a clear acrylic ruler above a cell phone flashlight. Or you can just hold the template up to a window if you are sewing in the daylight hours.
This Youtube video from Tiny Orchard Quilts demonstrates the paper and freezer paper method. She also uses a light box so you can see first hand the advantages of doing so:
https://www.youtube.com/watch?v=8cY3nou8GKY&t=400s
And finally a Youtube video from Rachel Rossi Designs using the freezer paper method and a light box:
https://www.youtube.com/watch?v=v0Z1RmMcA8Y
Feathery Friends is the name I have given to this free pattern from Riley Blake Designs. There is also a free pieced pattern. Get both patterns here:
https://www.rileyblakedesigns.com/follow-the-blue-bird
I made both the FPP and pieced blocks and hopefully you will too and see which method you prefer.
So let's get started...
FPP Feathered Friends Block
Materials
Fabric:
3" x 22" for bird body (solids or prints)
5" square for wing (solids or prints)
1/5" x 5" strip orange or yellow for beak and legs
5" x WOF for background; low volume prints or solid white or cream
2 1/4" x 8 1/2" background fabric for Section F
NOTE: Fabric can be irregularly shaped so you can utilize your scraps. It is advisable to cut fabric approximately 1/2" larger than the portion of the template to be covered.
You also have the option of cutting the fabric pieces in advance in a more accurate fashion by cutting out each individual paper segment and placing the paper segment on a piece of fabric. Cut the fabric using the template as a guide and leave approximately 1/2" seam allowance all around. You will then need to keep the fabric pieces together with the corresponding paper template so it will be easy to grab each piece when needed. If you choose the latter method you will, of course, need to print two templates; one for cutting fabric segments and one for actually sewing the fabric pieces to the paper template.
FPP Template
scissors for cutting paper
rotary cutter
ruler
glue stick
pins
credit card or other tool with which to fold the template to score a crease along the printed line
 |
| Prepping |
Instructions
1. Set stitch length to approximately 1.5 or whatever setting on your machine will give you 18 to 20 stitches per inch. The small stitches help to perforate the paper and make it easier to tear off. I use whatever needle happens to be in the machine but some guidelines suggest using a smaller sized needle. It is also recommended to replace the needle after paper piecing. I would do that if I did a large FPP project but for just a few blocks I personally wouldn't replace the needle. Totally up to you though.
2. Print the template. To ensure that the pattern has printed to the correct size, measure the 1" test square to ensure that it is indeed 1". I had to set my Brother laser printer to 102% to get the correct size.
3. Using a pen or pencil notate the paper template segments with the corresponding fabric designations as follows:
Beak and legs: A1, E2 E4
Background: A2, A3, A4, A5, A6; B2, B3, B4, B5, B6; C6, C7; D1, D3; E1, E3, E5, E6
Body and head: C2, C3, C4, C5; D2
Wing: C1
Do not skip this step. It will help to avoid confusion
 |
| Notated template |
4. Using scissors, cut out each of the 5 template pieces along the outermost line on each template
 |
| Cut the template pieces |
5. I suggest that you begin with Section D as it is the easiest and will give you a feel for the process.
NOTE: It is important to sew the fabric to the paper template in sequential order
If you are new to FPP or need a refresher, this Youtube video by Violet Craft uses an identical template to the Section D template we are starting with. Skip the intro if you wish and start at 2:46
https://www.youtube.com/watch?v=RnmX8lpLpVc&t=174s
Place a credit card along the solid line between template piece D1 and D2 and fold the paper over to make a crease
 |
| Fold along line to make a crease |
Place the wrong side of the background fabric on the blank side of section D1 of the paper template. Check to see that it covers the entire D1 section of the template and overlaps the other sections by at least 1/4" . Put a small dab of glue on the blank side of the paper template and affix the wrong side of the fabric to the paper. Or pin the fabric in place if you prefer. I glued and pinned. Overkill! The right side of the fabric should be facing you when the paper template is flipped to the blank side
 |
| Fabric secured on Section D1 |
Fold along the crease again and trim 1/4" away from the folded edge. I used my Quilter's Magic Wand. I can't recommend this tool enough
 |
| Trim 1/4' away from folded edge |
Fold the paper back down and flip the paper template over to the blank side. Place the D2 bird body piece on top of the D1 background piece, right sides together, again ensuring that piece D2 entirely covers that section of the template and overlaps the corresponding sections by at least 1/4". Pin in place.
Once again, flip the paper over to the printed side and fold the paper on the creased line. You can trim 1/4" from the folded edge now if you like. I did not trim until after I stitched the seam. You can see in the photo below that I used a much larger piece that I needed for D2. It is better to use larger pieces than you think you will need to ensure complete coverage on different sections of the paper template. Of course this is not a concern if you pre-cut your fabric pieces to match the template segments.
Starting print side up, sew along the line between D1 and D2. Begin with a couple of stitches and reverse a stitch or two. Continue stitching to the end of the line and reverse a couple of stitches. It is not essential to start and stop with backstitching. You can also sew slightly beyond the line when starting and ending, if you wish. Clip threads and finger press or iron
 |
| Sew along lines between D1 and D2 |
 |
| D1 and D2 sewn together |
 |
| Trim 1/4" from the D1 and D2 fold |
 |
| D1 an D2 trimmed |
Continue in the same manner sewing Section D3 to D2
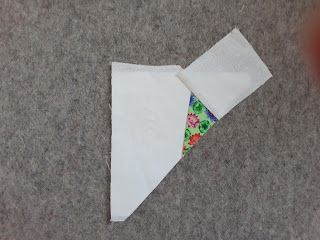 |
| Section D3 sewn to D2 |
Trim the template segment and proceed to paper piece the remaining four templates. Do not remove the paper yet.
6. Assemble the block as follows:
A + B
C + D
AB + CD
ABCD + E
And finally, sew F to the top of the block.
7. Carefully remove the paper. The completed block should measure 8 1/2" square
 |
| Completed block 8.5" x 8.5" |
Pieced Feathered Friends Block
1. Select and cut fabric according to the directions. Label each fabric piece with the corresponding letter designation from the pattern. I like to use washi tape for this purpose
 |
| Fabric cut and labelled according to instructions |
2. Sew beak unit I and N
3. Sew O background rectangle to the top of the I/N unit
4. For the head unit sew the V and Q background squares to the B body rectangle
5. For the upper tail unit sew the E body square and T background rectangle
6. For the breast unit sew the C body rectangle and the U background square
7. For the wing unit sew the F body and D body squares to the G wing rectangle
8. For the lower tail unit sew the A body rectangle and the S background square
9. For the legs unit sew each of one H leg rectangle to both sides of the P background rectangle and press towards P (the HPH unit)
10. Sew the K background rectangle to the left side of the HPH unit and sew an M background rectangle to the right side of the HPH unit. Press towards K and M
 |
| Units completed and ready for assembly |
Block Assembly
1. Sew the beak, head and upper tail unit together. Press seams open
2. Sew the breast, wing and lower tail units together. Sew the L background rectangle to the breast unit. Press seams open
3. Sew these two units together and then sew the R background rectangle to the right edge. Press seams open
4. Sew the J background rectangle to the top
5. Sew the legs unit to the bottom
6. Trim the block to 8 1/2 " square
 |
| Completed block 8.5" square |
Thank you for participating in the Ottawa Modern Quilt Guild BOM. I hope you enjoyed hatching some feathered friends. I am eager to see the flock.
Theresa Cody