

We are looking for participants in a new challenge. Have you ever played the group game "Broken Telephone"? It is a little like Pictionary. One person thinks of a phrase. The next person draw that phrase as best as they can. Without knowing the original phrase, the next person describes the drawing and on it goes. At the end everyone has a good laugh at the progression.
Well, we are going to try to adapt this to modern quilting.
The first person will start with a photo and create and abstract mini quilt (approximately 12" by 12") to represent the photo and sends a photo of the quilt to the second person.


The second person writes a description of the abstract mini quilt without ever having seen the original photo and send that description to the third person. The description for this quilt could be:
"There is a large rust orange triangle in the bottom left. two broad light dusty blue stripes run from each top corner to the edge of the orange triangle. In the middle is a rectangular grey box with a light grey top at an angle so three sides are visible. There is a rectangular moss green patch in the middle of the top of the box. There is also a curved moss green strip coming out of the middle of the front of the box and extending to the bottom edge."
The third person then makes a new mini quilt based on the description they received from the second person and sends a photo to the forth person.
And on it goes.
Each participant would have a turn at describing a quilt and at making a quilt. Participants will be given a few days to write a description and 3 to 4 weeks to make a mini quilt (or at least the pieced top). The quilts are to be approximately 12 inches square. We hope to have at least 4 participants.
We are looking for participants in a new challenge. Have you ever played the group game "Broken Telephone"? It is a little like Pictionary. One person thinks of a phrase. The next person draw that phrase as best as they can. Without knowing the original phrase, the next person describes the drawing and on it goes. At the end everyone has a good laugh at the progression.
Well, we are going to try to adapt this to modern quilting.
The first person will start with a photo and create and abstract mini quilt (approximately 12" by 12") to represent the photo and sends a photo of the quilt to the second person.
The second person writes a description of the abstract mini quilt without ever having seen the original photo and send that description to the third person. The description for this quilt could be:
"There is a large rust orange triangle in the bottom left. two broad light dusty blue stripes run from each top corner to the edge of the orange triangle. In the middle is a rectangular grey box with a light grey top at an angle so three sides are visible. There is a rectangular moss green patch in the middle of the top of the box. There is also a curved moss green strip coming out of the middle of the front of the box and extending to the bottom edge."
The third person then makes a new mini quilt based on the description they received from the second person and sends a photo to the forth person.
And on it goes.
Each participant would have a turn at describing a quilt and at making a quilt. Participants will be given a few days to write a description and 3 to 4 weeks to make a mini quilt (or at least the pieced top). The quilts are to be approximately 12 inches square. We hope to have at least 4 participants.
Thanks for playing and Thanks to Jenn S. for organizing us!
Group #1

Inspirational Photo
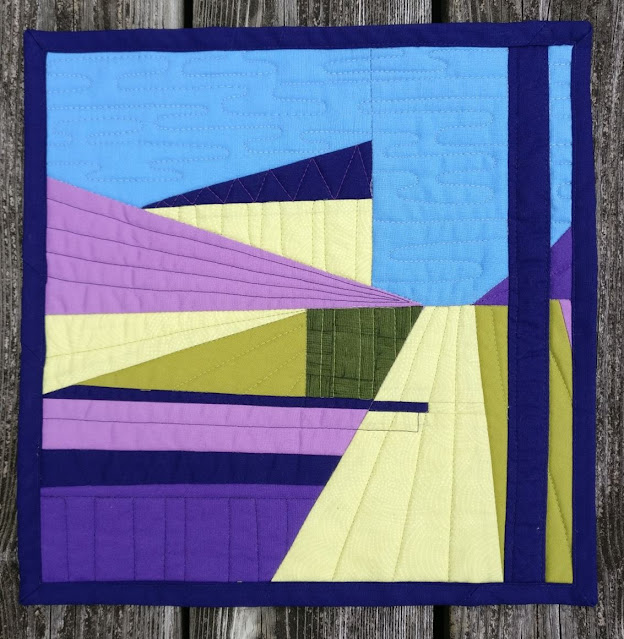
Description #1 by EP P. This is a 12x 12-inch square.
The quilt is split into 2 equal pieces across the middle. I’ll call it a horizon line because some pieces make it look like that in the end.
Above the horizon is a deep lilac triangle. It starts half way of the left side of this section at the edge of the quilt and extends across the section until it touches the horizon line 2/3rds across the piece. It forms a slope from the left edge to that point.
There is a small space of about 1.5 inches at the horizon after which a new triangle begins in a deep purple. It travels to the right edge of the quilt and goes up the quilt by the same distance. Almost looks like an equilateral triangle.
From the deep lilac slope on the left side, there is a cornflower yellow rectangle peeking out. You see half the rectangle so it looks like another triangle placed 1/3rd the way down the slope and ending about 1/8th before the end of the slope.
This cornflower piece is topped by a deep royal blue triangle that start at the left where the yellow and lilac intersect and rises to the right about half as high as the yellow piece. It forms a right-angled triangle and is flush with the right side of the yellow triangle below it.
Everything else above that middle horizon line is a bright sky blue.
Below the horizon/middle line, there are 2 yellow cornflower pieces. The first is on the left. It goes down the left side not quite as far as the “above horizon” yellow piece is tall; and forms a triangle that meets the horizon about 2/3rd of the way down the large lilac piece above.
The 2nd yellow cornflower piece forms a path from the bottom edge to the horizon. The top left edge of the path meets the corner of the lilac and the middle/horizon line. The right top edge meets the deep purple corner at the horizon line.
The right side of this path meets the bottom edge of the quilt about ½ the distance of the purple sitting at the horizon line. The left side of the road meets the bottom at about a 45-degree angle.
To the right of this yellow swath is a light moss slice that parallels the yellow. Its right side starts about a ½ inch inside the bottom edge of the purple horizon piece. This leaves a very small portion of quilt to the right which is a triangle/wedge of the deep lilac colour.
To the left of the yellow slice/path – holy cow.
You now have a section which will be bordered by the yellow “path” to the right, some of the horizon lilac; and the yellow triangle along the top of the section. So, you’ve got a 5-sided section that forms the left bottom corner of the quilt and fills about half of the visual space below the horizon.
Take this shape and divide it into 3 equal portions horizontally. The top section is 3 pieces.
The moss green forms the left side as a right-angled triangle that meets the horizon where the yellow does. Beside it is a dark moss (or grungy green) that fills the space right up to the yellow road. The bottom of these two pieces is covered by a thin slide (maybe ¼ inch) of royal blue that meets the yellow wedge at the left side of the quilt and it now quite straight so pulls the line down to the right where it meets the yellow path piece. Note: the line crosses this yellow path piece. It extends about halfway across it.
The second piece is 2/3 lilac and 1/3 royal blue. The lilac starts at the left border where the yellow and 1st section meet and stops at the yellow path. The royal blue does the same right underneath it.
The 3rd piece of this section is filled with the deep purple.
With all these pieces together, you slice the quilt from top to bottom edge about 1 inch from the right side and insert a 1-inch piece of royal blue. Then bind the quilt in the same royal blue.

Mini Quilt #2 by Kirsten F.
I’ll describe this in two sections. Each section is about half the quilt.
Top; divide this into thirds vertically.
A. The two thirds piece on the left has a light blue section in the upper half. There is a medium purple right angle triangle laying on the bottom. The short side is on the left edge and is about half the length of the side that is sitting on the bottom. The hypotenuse runs top left to bottom right. About half way down the hypotenuse there is another acute angle triangle laying on the hypotenuse side. The base of this triangle would be up the right side of this section. The acute triangle is made of two colours; navy blue on top and a sunny yellow on the bottom.
B. The third piece on the right has a light blue rectangle with a black triangle in the bottom right corner. The triangle is about 1/3 up the right side and half way across the base of the rectangle.
Bottom; GOOD GRIEF!!!!
Let’s go out this in sections too!
There is a prominent sunny yellow trapezoid sitting kind of in the middle-ish . The top of the trapezoid runs from the bottom left of B section above to the tip of where the black triangle starts. The right side angles toward the right about 95 degrees and reaches to the bottom of the quilt. The bottom of this trapezoid covers about half the base of the quilt.
To the right of this sunny yellow trapezoid, there is a medium green parallelogram. Its about an inch wide. To the right of this parallelogram is a medium purple trapezoid that takes up the rest of the space.
Now for the part that is on the left of the Yellow brick road! (I mean that yellow trapezoid), Let’s divide that into thirds horizontally.
The top third, has two shapes; a green and yellow rectangle and a black quadrilateral. The rectangle is green, but there is a yellow triangle in the upper left corner. It takes up about 1/3 of the rectangle.
The middle third, is a light purple quadrilateral.
The bottom third is a burnt maroon purplish quadrilateral.
So, once you get this all sorted out…. Imagine a one inch dark purple strip that runs vertically from the top to the bottom of the quilt, about an inch and a half inside the left side of the quilt.
There is another one inch dark purple strip that runs perpendicular to the vertical strip under the green and yellow rectangle and black trapezoid and it extends about 2 inches into the yellow trapezoid.
There is another one inch dark purple strip that runs along the bottom of the light purple section but it ends at the edge of the yellow trapezoid.

Block is divided in two vertically.
First half: There is a red strip vertically, next to it is a dark purple strip, followed by a light purple strip, then another dark purple these are about half the length of the block. A small piece of green was cut on a diagonal, with yellow as the second colour, underneath is a piece of black. This unit is the same length as the strips and is positioned next to them.
The bottom half is a yellow rectangle, the topside cut on an angle using the top part of the block the last dark purple strip goes into the yellow rectangle. A strip of green is underneath horizontally on the bottom then a purple strip under that.
The second part of the block is a blue rectangle the width of half the block a medium purple triangle on the top left corner in the middle of the blue there is a navy and yellow triangle. On the bottom left corner there is a small black triangle.
Across both sides a few inches from the top there is a dark purple strip that goes from left to right.

Mini Quilt #4 by Jane W.
Group #2

Inspirational Photo #2

Mini Quilt #1 by Elaine M.
Description #1 by Jane W.
The lower ¼ of the block is yellow-running horizontally across the width of the block.
The remaining upper ¾ of the block has a blue ‘background’
Slightly to the left of centre of the block, in the blue area, is a large ‘X’ that is a brownish shade but has a white centre.
Centered under the large X in the blue quadrant, is an orange pentagon with a small vertical brown rectangle inside it lined up on the lower edge of the pentagon. The pentagon is sitting on the top edge of the yellow strip.
To the right of the large X area, still in the blue section, but sitting on the top edge of the yellow strip, is a thin right-angle orange triangle pointing upwards. The straight edge of the triangle runs parallel to the raw edge approx an inch in from the edge. The triangle is approximately the same height as the pentagon.

mini Quilt #2 by Karen M.
Description #2 by Sue F.
There is a strip across the bottom that is about 3 inches in depth and is goldenrod in colour. Sitting on that strip, on the right hand side, is a light grey rectangle just over half the width of the entire block with another 3 inch strip on the top in the same grey fabric. About an inch from the right hand side is an orange triangle, the top point of which starts at this grey strip and is foundation paper pieced into the grey fabric. This triangle’s straight side is on the right, the short side, about one inch long, sits on the goldenrod strip and the long side completes the triangle on the left. This triangle could be compared to half a Christmas tree shape. The bottom of the left side of the block is solid orange, except for a small brown piece, also sitting on the goldenrod strip which is the door to the windmill. The top of the left side of the block has four, brown windmill blades connected by a peach coloured little square in the centre. Between the three top blades are grey triangles (sky). Between the bottom blades is an orange triangle (roof).

Mini Quilt # 3 by EP P.
Description #3 by Kristen F.
There are 6 colours/fabrics in this quilt. For value, I will list from lightest to darkest.
- Solid, light grey (like a cloud)
- Solid, bright yellow (like a primary colour or sun)
- Blender, peach like a grunge
- Solid, orangey yellow (think like a pale unripened orange-the fruit)
- Solid, medium grey
- Blender, rust with a tiny print pumpkin in black outline.
These are all finished sizes, and not cutting instructions, so please add in seam allowance. This 12 inch mini will be pieced in 3 sections across the horizon. Draw your 12 inches square, from the top, count down 5 inches and draw a horizontal line across, the next section will be from the line you just drew, count down 4.5 inches and draw a line across, this leaves the third section at 2.5 inches.
Section 1, the first/top section.
I will divide this first section with a vertical line at 5 inches from the left. This gives you a square (5x5) on the left and a rectangle (5x7) on the right. The rectangle is medium grey. The square is made of 4 half square triangles (hst). 3 hst will be the rust and medium grey. The 4th hst will be rust and orangey yellow. Make a windmill placement or pinwheel of the 4 hsts, like this:
The first block in that square, will be a grey/rust hst, it will have the grey on the bottom and rust on top, the diagonal is from the top left to the bottom right.
The second block on the top left, is another med grey/rust with the grey on top and rust on the bottom, and the diagonal goes from bottom left to upper right corner.
The third block is the bottom left, rust on top, orangey yellow on bottom with the diagonal going from bottom left to top right.
The forth block is rust/med grey with the grey on top and rust on the bottom with the diagonal going from the top left to bottom right.
Once these 4 pieces to the square are pieced together, cut a 1 inch square of the peach and appliqué it to the centre of that pieced block. Then, take the finished block and piece it to the medium grey rectangle. Finished block on the left, med grey on the right. That completes the top, first section.
Section 2 or the Middle section:
Divide this section with a vertical line at 5 inches from the left. This line matches/lines up to the top section.
The left square is orangey yellow and has a small 1 inch wide and 1.5 inch long piece of rust fabric appliquéd on it. The 1 inch side is lined up to the bottom seam, and the left edge of the appliquéd piece is 3 inches in from the left edge of the background.
The right piece of this middle section is the light grey with a triangle of the orangey yellow. From the right edge of the grey, about 1.5 inches in from the edge, a right angle triangular piece of yellow is inserted. The tip of the triangle makes a blunted point (no wider than 1/4) at the top of this section, and the bottom of the yellow triangle is about 1 inch wide. You can then draw the diagonal straight line from the tip to the bottom. The light grey is also on the left of the yellow triangle. Piece the left & right blocks together and that finishes section 2.
Now if you piece section 1 & 2 together, ensure the vertical lines are aligned. I see an interpretation of a windmill and fence (maybe)
Section three is the bright yellow, plain, across the bottom, 2.5x12. Maybe a wheat field?
That completes your mini, I hope my instructions are clear enough for you and I hope you enjoy the adventure and puzzling!

Mini Quilt #4 by Cheryl T.
No comments:
Post a Comment